How to Deploy Static Site to GCP Cloud Run
Table of Contents
1. 撰文動機
筆者曾經協助過區塊鏈工程師製作 landing page,不過當時僅使用 Vue 進行 UI 的簡單開發,沒有打包 Docker image 就直接轉交他人進行部署了。恰好最近需要練習 Nginx、Docker、Google Cloud Platform 等前端工程師較少接觸的領域,所以把當年的專案翻出來,使用上述技術進行部署練習。
2. Nginx
由於不需要處理 WebAPI 請求,所以我們直接使用 Nginx 作為靜態資源 web server,針對 HTTP request 回應對應的靜態資源,並進行 cache、compression 壓縮等處理,在設定上有許多眉眉角角,以下我們就一一拆解。
2.1 Handle Request URL
設定 listen 、 root 以及 location ,根據 request URL 回應對應路徑的檔案。若為 SPA,則需要設定 try_files 進行內部重新導向至 index.html,將決定頁面渲染的邏輯交由前端的 History API 來決定:
server {
  listen $PORT; # 在 Nginx image 內注入的環境變數,後面章節會提到。
  root /usr/share/nginx/html;
  location / {
    try_files $uri /index.html;
  }
}
需要特別注意 . 開頭的 hidden file 通常不希望能被存取,為保險起見加上 deny 規則:
server {
  location ~ /\. {
    deny all;
  }
}
2.2 Compression
利用 ngx_http_gzip_module 針對 text-based 的檔案進行壓縮:
server {
  # 預設僅開啟 `text/html` MIME Types Response 的壓縮
  gzip on;
  # 指定除 `text/html` 以外也需被壓縮的 MIME types response
  gzip_types text/plain text/css text/xml text/javascript application/javascript  application/xml;
  # add `Vary: Accept-Encoding` header
  # reference: https://developer.mozilla.org/en-US/docs/Web/HTTP/Caching#varying_responses
  gzip_vary on;
  # compression level, 1 ~ 9 可供選擇
  gzip_comp_level 1;
  # 根據 response header `Content-Length` 決定是否進行壓縮
  gzip_min_length 10240;
}
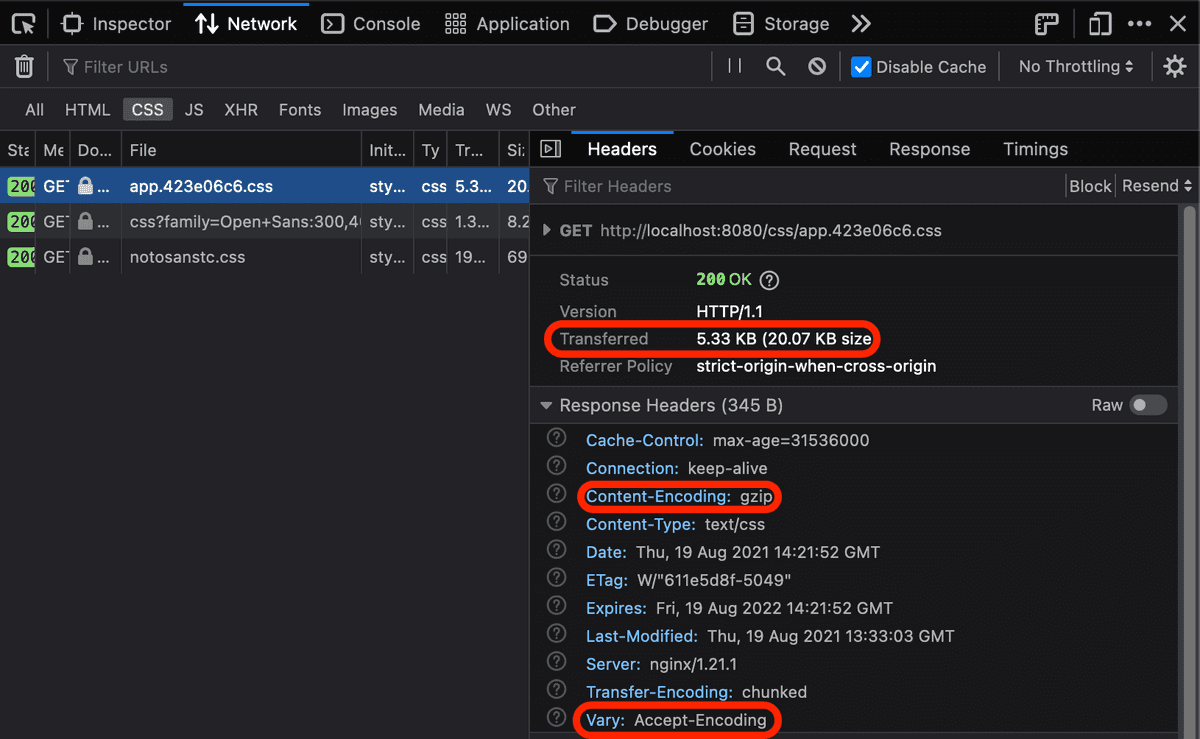
在 Devtool 中可以看 Gzip 為我們節省了許多網路流量:
2.3 HTTP Cache
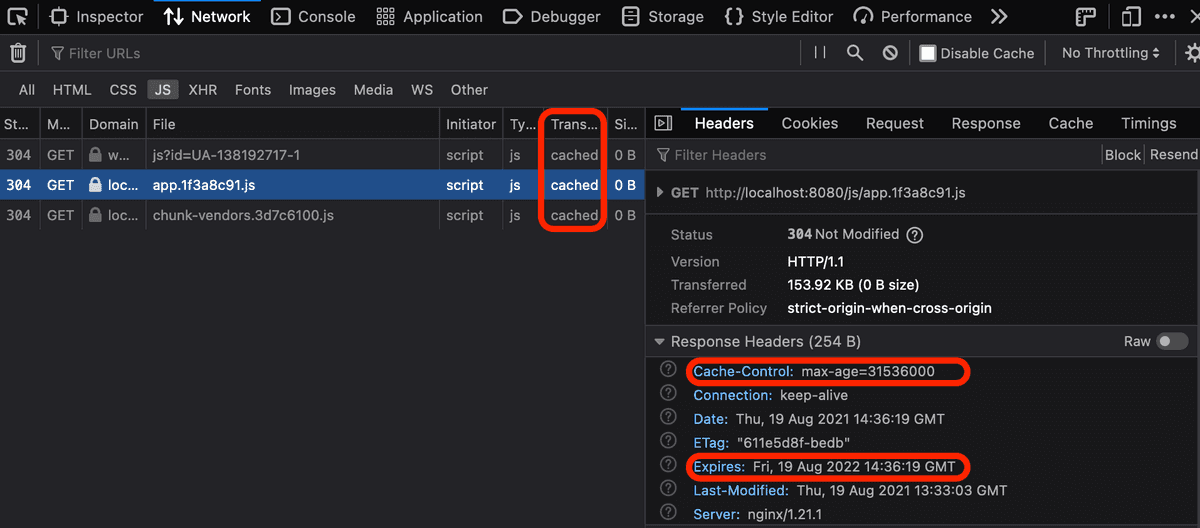
針對 webpack long-term cache 產出的 css/js/image 設定極長的 expires ,利用 cache 達到增進效能、減少 server 網路流量的效果:
server {
  location ~* \.(css|js)$ {
    expires 365d;
  }

  location ~* \.(jpg|jpeg|png|gif)$ {
    expires 365d;
  }
}
以上僅是很基本的設定,若要對效能進行調校、改善開發環境,可以參考以下連結:
- GitHub - denji/nginx-tuning: NGINX tuning for best performance
- Github - Sample Nginx config with sane caching settings for modern web development
3. Docker
Docker 協助建置、測試並且打包成一個獨立網頁應用,只需建置一次 Docker image,即可在任意機器、平台、服務上執行,避免環境設定、套件安裝等繁雜工作。
3.1 Dockerfile
撰寫 Dockerfile 強烈建議要看過這篇 Intro Guide to Dockerfile Best Practices ,正確的撰寫方式可以使用 cache 大大減少 build time,也減少 image size 避免不必要的網路傳輸。
這裡需要兩個 Base Image,用 multi-stage 的方式進行 docker build:
- Node image :用來安裝相依套件,測試後產出
dist。 - Nginx image :將
dist、nginx.confcopy 至 Nginx 會讀取的 folder 底下,並設定監聽 port 號。
FROM node:16.5 as builder
WORKDIR /app
COPY package.json yarn.lock ./
RUN yarn install --frozen-lockfile
COPY . .
RUN yarn lint && yarn test && yarn build
FROM nginx:1.21.1-alpine as prod
ARG REVISION_ID
LABEL revision_id=${REVISION_ID}
COPY nginx/nginx.conf /etc/nginx/templates/default.conf.template
COPY /app/dist /usr/share/nginx/html
ENV REVISION_ID=${REVISION_ID}以上 Dockerfile 有幾個小細節:
REVISION_ID:作為 debug 用途,可以快速找出這顆 image 對應的 git commit。- 將
nginx.confcopy 至/etc/nginx/templates底下:當 container 啟動時會將環境變數注入/etc/nginx/templates底下的設定檔後搬移至/etc/nginx/conf.d/中。我們在前面已經在nginx.conf中有指定監聽PORT這個環境變數。
3.2 Build Docker Image
執行以下指令建置 docker image:
docker build \
  --build-arg REVISION_ID="$(git log -1 --format=%H)" \
  --tag galtz/vue-landing-page \
  .
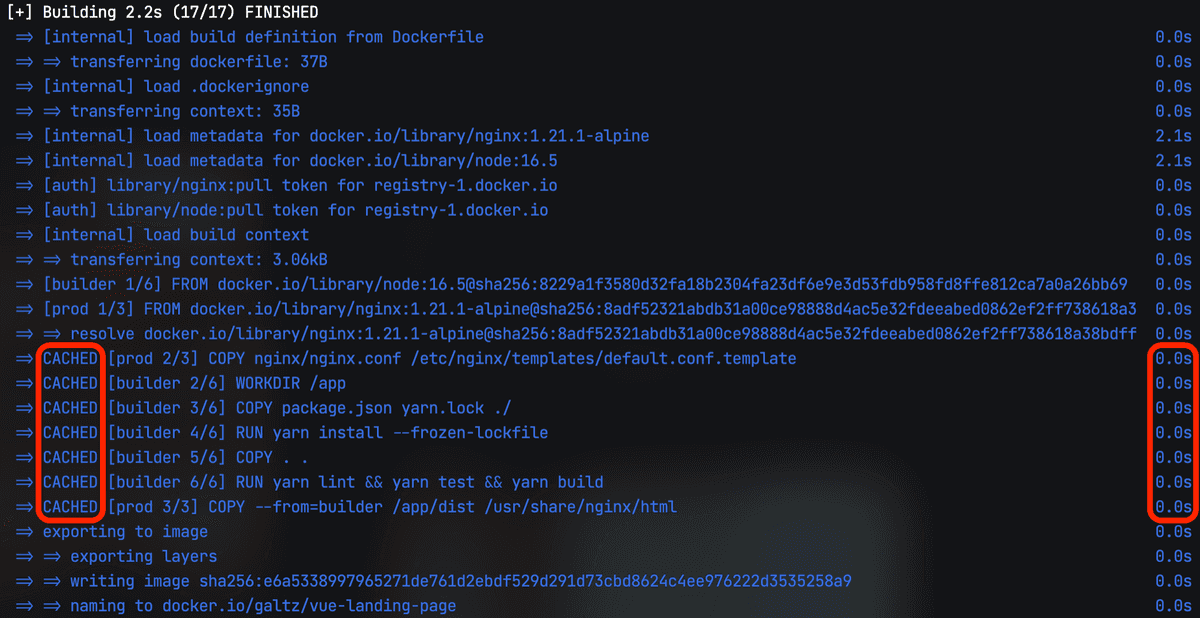
重複執行時 Docker build 會使用 cache,只要不修改 package.json 就不會執行 yarn install,節省了不少時間!
Run Docker image:
docker run \
  -dp 8080:8080 -e "PORT=8080" \
  --name vue-landing-page \
  galtz/vue-landing-page
3.3 Build Scripts
每次都需要打這一大串指令相當不直覺也超麻煩,這裡稍作整理將 build image 所需要檔案和腳本整理如下:
vue-landing-page/
├── build/
│   ├── build-image.properties
│   └── Dockerfile
└─── scripts/
    ├── build-image.sh
    └── run-image.sh
將未來可能需要進行調整的 image name 放入 build/build-image.properties 中:
IMAGE_NAME=galtz/vue-landing-pagescripts/build-image.sh:
#!/bin/bash

set -ex

REVISION_ID="$(git log -1 --format=%H)"
SH_DIR="$(cd "$(dirname "$0")"; pwd -P)"
ROOT_DIR="$(dirname $SH_DIR)"
BUILD_DIR="${ROOT_DIR}/build"
DOCKERFILE="${BUILD_DIR}/Dockerfile"

source ${BUILD_DIR}/build-image.properties

docker build \
  --build-arg REVISION_ID=${REVISION_ID} \
  --tag ${IMAGE_NAME} \
  --file ${DOCKERFILE} \
  $ROOT_DIR
這邊有一個 shell script 的小訣竅: set -ex,-e 代表有某一條指令失敗了就不會繼續往下執行; -x 則是印出每條指令和變數,debug 起來特別方便,效果如下:

scripts/run-image.sh:
#!/bin/bash

set -ex

SH_DIR="$(cd "$(dirname "$0")"; pwd -P)"
ROOT_DIR=$(dirname $SH_DIR)
BUILD_DIR=$ROOT_DIR/build
CONTAINER_NAME=vue-landing-page
PORT=8080

source $BUILD_DIR/build-image.properties

docker run \
  -dp ${PORT}:${PORT} -e "PORT=${PORT}" \
  --name $CONTAINER_NAME \
  $IMAGE_NAME
接下來就能透過腳本建置後運行:
./scripts/build-image.sh && ./scripts/run-image.sh4. Google Cloud Platform
確認在本機運行 container 沒問題後,下一步就是要讓全世界能夠看到我們的網站!基本上不可能為了搭建這個網站就去自建機房處理設備、網路、儲存、效能、備份、安全性等問題,所以這裡選擇使用 Google Cloud Platform(以下簡稱 GCP) 提供的服務,協助我們整合 CI/CD 自動進行建置、測試、部署至雲端,讓我們有更多餘力專注在開發上。
開始使用前要先建立 GCP 的 project 並且設定好付款資訊,接著下載 Google SDK 即可在本機進行操作,官網有詳細文件,這裡不再贅述。
4.1 Artifact Registry
Artifact Registry 讓你能夠儲存 Docker image 或各種語言的 package,如:npm、 maven、python 等,並且能夠輕鬆和其他 GCP 服務如 Cloud Build、Cloud Run 整合。
這裡我們新增一個 repositories 並指定 --repository-format=docker:
gcloud artifacts repositories create web-repo \
  --repository-format=docker \
  --location=asia-east1
列出所有 repositories,應該可以看到剛剛新增的 repositories,接下來我們的 Docker image 都會存放在這裡:
gcloud artifacts repositories list也可以至 Artifact Registry Console 瀏覽所有 repositories 和底下的 Docker images:
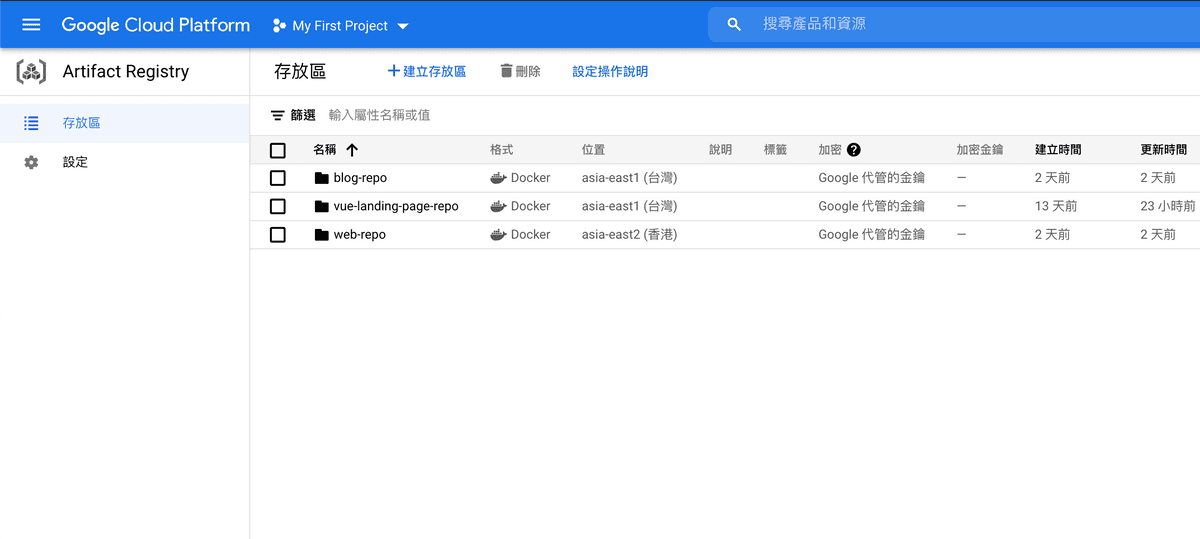
由於 Artifact Registry 是不能被所有人任意存取的,本機要存取這些 Docker image 必須進行以下設定:
gcloud auth configure-docker asia-east1-docker.pkg.dev計費方式參考 Artifact Registry Pricing,基本上只要遵守以下幾點就不會有費用產生:
- 避免使用超過 0.5 GB 的 Storage。
- Google 產品內部網路輸出不要跨區域。
- 不要產生 Google 產品外部的網路輸出。
4.2 Cloud Build
Cloud Build 是協助我們持續建構、測試和部署的 CI/CD 服務,透過設定 Cloud Build configuration file 內的 steps 指揮 Cloud Build 完成任務。費用方面只要是使用預設的機器即享有每日 120 分鐘免費額度。
4.2.1 Local Manual Build
通常習慣將設定檔取名 cloudbuild.yaml 並放在專案根目錄,以下簡單解釋各欄位作用:
steps:指定 Cloud Build 的任務,每個步驟都是由docker run來執行。name:指定要使用什麼 cloud builder,這些 cloud builder 都是 container image。args:指定 cloud builder 執行的參數。images:指定 images 名稱,在所有 steps 完成後會自動 push 至 Artifact Registry 儲存。${PROJECT_ID}:執行時代換為目前的PROJECT_ID,參考 Default Substitutions。${REVISION_ID}:在 Cloud Build 執行時代換成 Trigger 建置的 Git Commit SHA,參考 Default Substitutions。
cloudbuild.yaml:
steps:
  - name: 'gcr.io/cloud-builders/docker'
    args:
      - 'build'
      - '--build-arg=REVISION_ID=${REVISION_ID}'
      - '--build-arg=NGINX_PORT=${_NGINX_PORT}'
      - '--tag=asia-east1-docker.pkg.dev/${PROJECT_ID}/vue-landing-page-repo/vue-landing-page:latest'
      - '--file=./build/Dockerfile'
      - '.'
images:
  - 'asia-east1-docker.pkg.dev/${PROJECT_ID}/vue-landing-page-repo/vue-landing-page:latest'
接著使用 gcloud builds submit 指令,將建置 Docker image 的任務提交給 Cloud Build。老樣子,為了避免指令落落長,我們撰寫 cloud-build.sh 腳本方便本機進行測試:
#!/bin/bash

set -ex

REVISION_ID="$(git log -1 --format=%H)"
SH_DIR="$(cd "$(dirname "$0")"; pwd -P)"
ROOT_DIR=$(dirname $SH_DIR)
BUILD_DIR="${ROOT_DIR}/build"

source ${BUILD_DIR}/build-image.properties

cd $ROOT_DIR
gcloud builds submit \
  --config cloudbuild.yaml \
  --substitutions=REVISION_ID=${REVISION_ID}
執行腳本建置完成後,就可以到 Viewing build logs 這裡查看 build results:
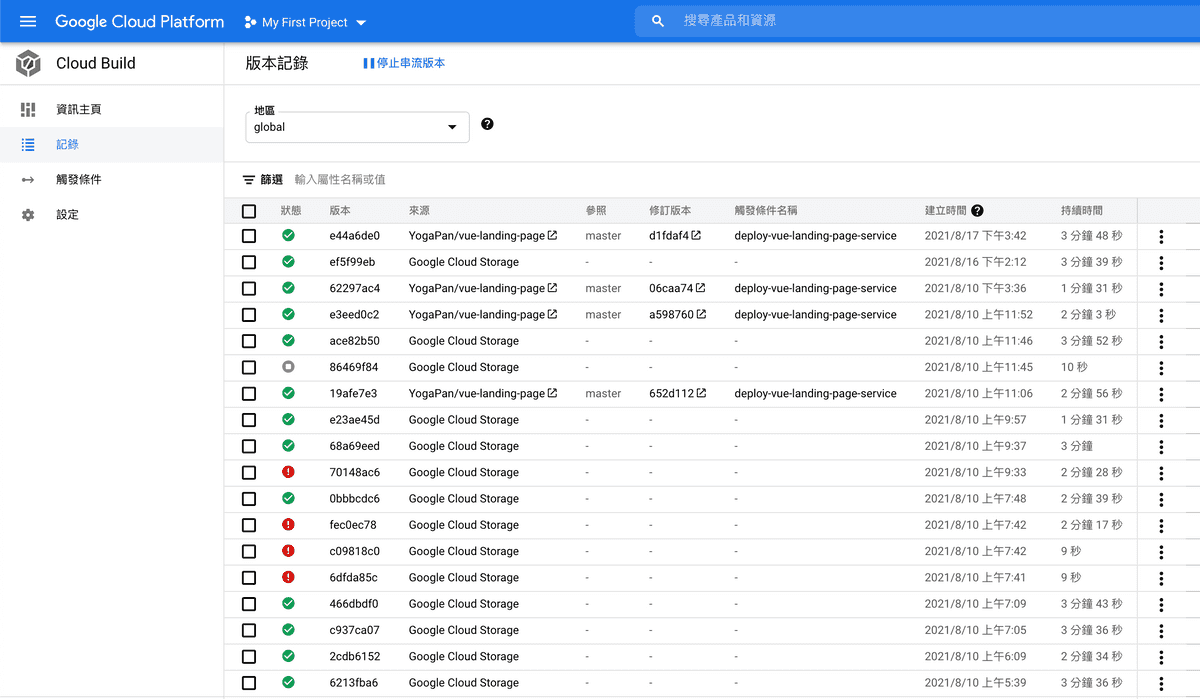
若有 performance 上的考量需使用 Docker image cache,可以閱讀官方這篇 Best practices for speeding up builds,其中的 Using a cached Docker image 方法用在 multi-stage 的建置會遇到無法完全利用 cache 的問題,需要拆分成多顆 image,參考 garethr/multi-stage-build-example/cloudbuild.yaml。
4.2.2 Trigger Cloud Build by Github Push Event
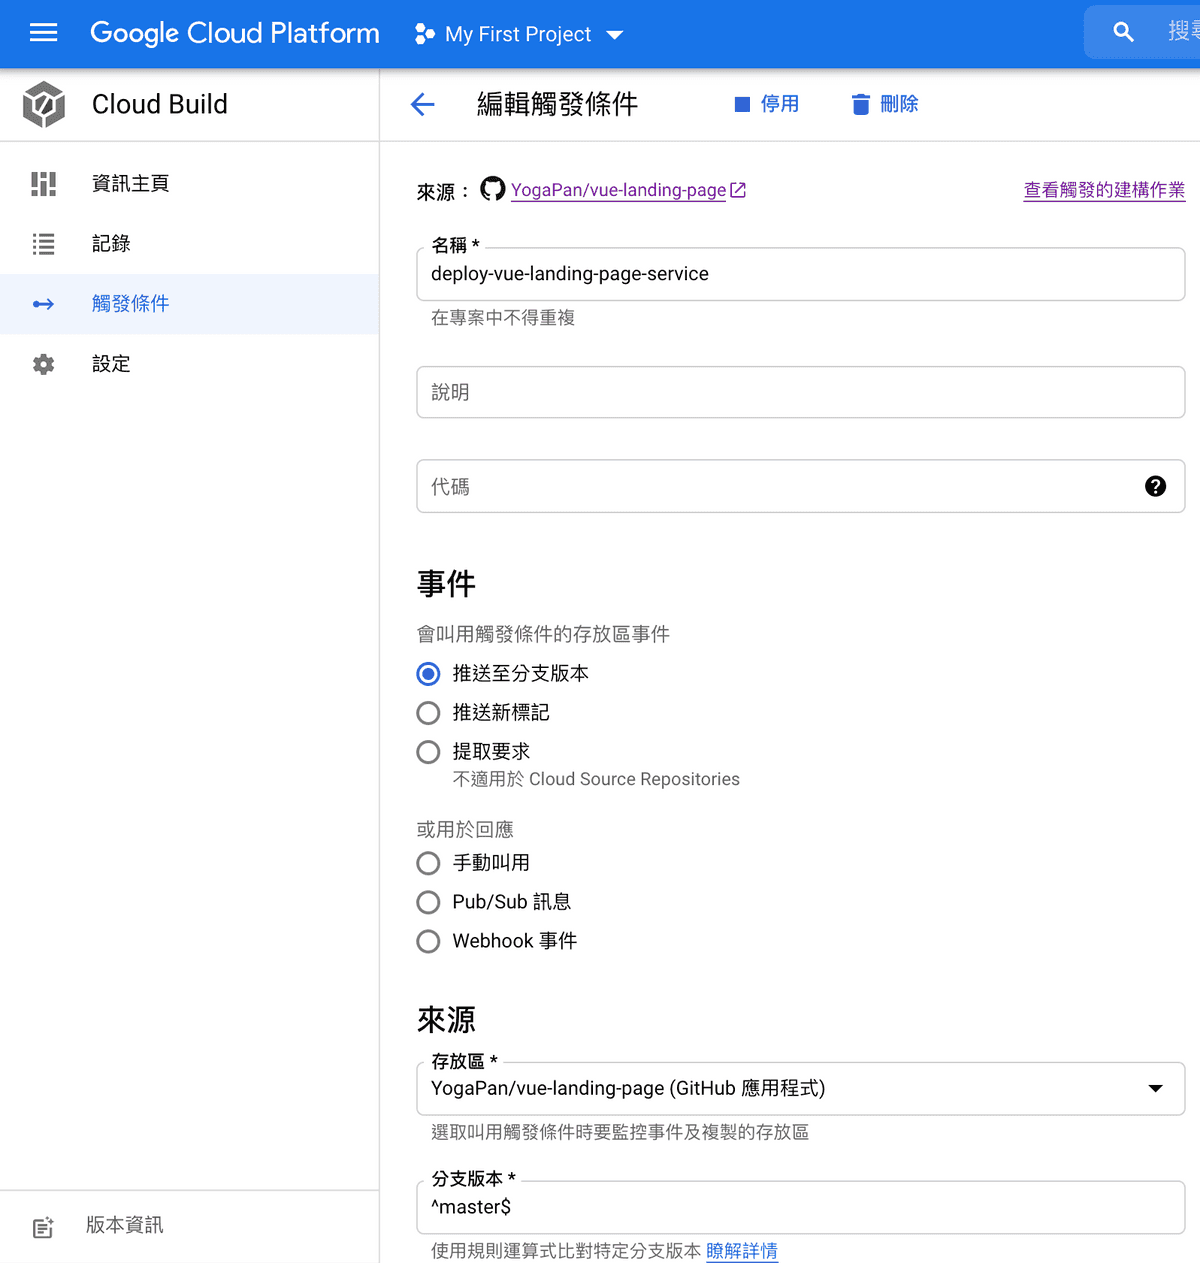
我們不希望每次都由手動來觸發 Cloud Build,應該要將流程自動化,當程式碼通過測試和 review 進到 master branch 後馬上觸發。Trigger(觸發條件) 能夠根據 push to a branch、push new tag 以及 pull request 等 event 觸發 Cloud Build 執行,和 Github 的整合官方有詳細的步驟,這裡不再贅述。
4.3 Cloud Run
Cloud Run 是 GCP 提供的 serverless 服務,只需透過 yaml 設定即可部署、運行 containerized app,完全不需管理 server infrastructure,讓我們能專注在開發上。它具備 autoscaling 的能力,根據當下 traffic 來分配計算資源,在沒有 request 時 scale-to-zero。這意味著我們的網站 handle request 時才計費:
          request1            response1
                |   request2     ʌ      response2
                |        |       |       ʌ
                v........|......./       |
                         |               |
                         v.............../

|-----FREE-----|----------BILLED----------|----FREE...
以上圖表節錄自 Google Cloud Run - FAQ by Ahmet Alp Balkan ,licensed under Creative common Attribution 4.0 International (CC BY 4.0) 。最新、最詳細的計費方式請以官方 Cloud Run Pricing 為準。
可以看到當沒有網路請求時,運行的 container 數量為 0:
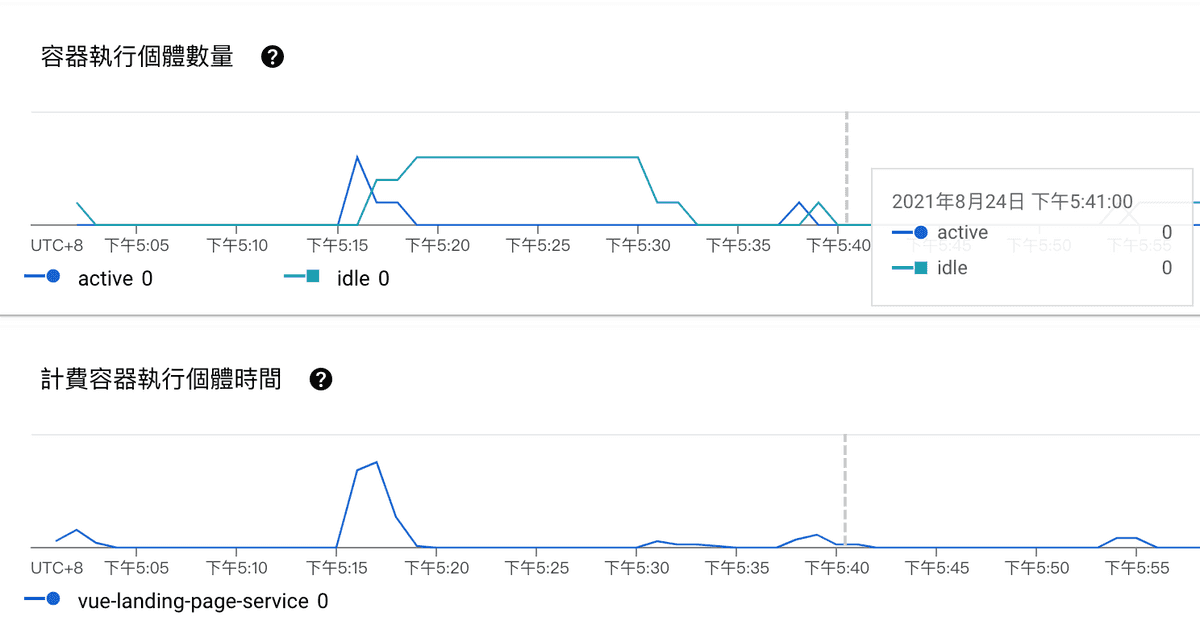
哇!聽起來好棒棒!不過也有幾點值得注意:
- cold start:如果長時間沒有接收到請求,那麼下一次請求會有額外的延遲。不過這對於我們單純的靜態網站幾乎不會造成什麼影響。
WebSocket:由於 WebSocket 連線是長時間持續的,可能會導致用量增加,你要花的錢錢也就變多了!還有很多眉眉角角建議直接參考官方文件:Using WebSockets。
接下來在 cloudbuild.yaml 加入新的 steps,成功 build image 後使用 Cloud SDK image 部署至 Cloud Run:
steps:
  - name: 'gcr.io/cloud-builders/docker'
    args:
      - 'build'
      - '--build-arg=REVISION_ID=${REVISION_ID}'
      - '--tag=asia-east1-docker.pkg.dev/${PROJECT_ID}/vue-landing-page-repo/vue-landing-page:latest'
      - '--file=./build/Dockerfile'
      - '.'
  - name: 'gcr.io/google.com/cloudsdktool/cloud-sdk'
    entrypoint: gcloud
    args:
      - 'run'
      - 'deploy'
      - 'vue-landing-page-service'
      - '--image=asia-east1-docker.pkg.dev/${PROJECT_ID}/vue-landing-page-repo/vue-landing-page'
      - '--region=asia-east1'
      - '--platform=managed'
images:
  - 'asia-east1-docker.pkg.dev/${PROJECT_ID}/vue-landing-page-repo/vue-landing-page:latest'
接下來只需要透過經程式碼 push、merge 至 Github master branch,就會自動觸發 Cloud Build 並且部署至 Cloud Run。
5. 結語
這次主要是作為練習用途,在工作上很難有所謂的「純前端工程師」🙄,各式各樣的技術都應涉略,可以減少往後和後端、SRE 小夥伴協作溝通的成本。
在服務的選擇上,僅單純要部署靜態網站且不需要進行複雜設定的話,我會優先選擇 Netlify,使用更為簡單、輕鬆整合 CI/CD、以及 Deploy Previews 的功能,如本 Blog 就是使用 Netlify 提供的服務進行建置和部署。另外還有其他選項,如 Firebase Hosting。
部署完了還需要 Custom Domain、利用 Cloud Logging 監控以及知道出事時要怎麼 Rollback,礙於篇幅留到下一篇文章再介紹。
6. 參考資料
除官方文件外,撰寫本篇文章時參考了以下資源:
- Optimizing Encoding and Transfer Size of Text-Based Assets
- 用基礎雲端概念來了解 GCP 的好
- CI/CD (持續性整合 / 部署) - 因為懶,所以更要 CI/CD!概念講解! | Kenny’s Blog
- Journey to Serverless on Google Cloud Platform | by Timothy | Google Cloud - Community | Medium
- GitHub - ahmetb/cloud-run-faq: Unofficial FAQ and everything you’ve been wondering about Google Cloud Run.
- GitHub - steren/awesome-cloudrun: 👓 ⏩ A curated list of resources about all things Cloud Run
